Skip to content

Join Today

Member portal

NSW Teachers Federation
  • Home
  • Courses
    • All Courses
    • All Conferences
    • Primary
    • Secondary
  • Journal
    • Journal Issue
    • For your Classroom
    • For your Staffroom
    • For your Future
    • For your Research
  • Podcast
  • About
    • Who we are
    • What we do
    • Our Presenters
    • FAQ
    • Contact Us

Journal Category: For your Classroom

Uncertainty, Error and Confidence in Data

Jim Sturgiss provides a straightforward guide to teaching some scientific concepts that are now part of the new Science syllabuses…

Uncertainty is a statistical concept found in the Assessing data and information outcome of the new Science syllabuses:.

WS 5.2 assess error, uncertainty and limitations in data (ACSBL004, ACSBL005, ACSBL033, ACSBL099)
This concept is not found in the previous syllabuses.
This paper addresses uncertainty as a means of describing the accuracy of a series of measurements or as a means of comparing two sets of data. Uncertainty, or confidence, is described in terms of mean and standard deviation of a dataset. Standard deviation is a concept encountered by students in Stage 5.3 Mathematics and Stage 6 Standard 2 Mathematics.
Not explored in this paper is the use of Microsoft Excel or Google Sheets which can calculate uncertainty of datasets with ease (=STDEV.S(number1, number2,…).

Figure 1 Karl Pearson

Karl Pearson (Figure 1), the great 19th-century biostatistician and eugenist, first described mathematical methods for determining the probability distributions of scientific measurements, and these methods form the basis of statistical applications in scientific research. Statistical techniques allow us to estimate uncertainty and report the error surrounding a value after repeated measurement of that value.

1. Accuracy, Precision and Error

Accuracy is how close a measurement is to the correct value for that measurement. The precision of a measurement system refers to how close the agreement is between repeated measurements (which are repeated under the same conditions). Measurements can be both accurate and precise, accurate but not precise, precise but not accurate, or neither.

Precision and Imprecision

Precision (see Figure 2) refers to how well measurements agree with each other in multiple tests. Random error, or Imprecision, is usually quantified by calculating the coefficient of variation from the results of a set of duplicate measurements.

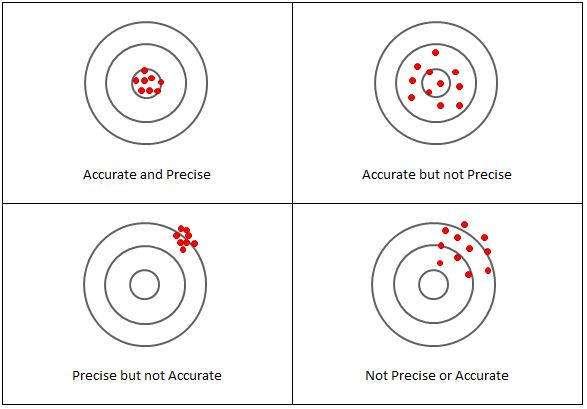
Figure 2 Accuracy and precision

The accuracy of a measurement is how close a result comes to the true value.

Error

When randomness is attributed to errors, they are “errors” in the sense in which that term is used in statistics.

  • Systematic error (bias) occurs with the same value, when we use the instrument in the same way (eg calibration error) and in the same case. This is sometimes called statistical bias.

It may often be reduced with standardized procedures. Part of the learning process in the various sciences is learning how to use standard instruments and protocols so as to minimize systematic error.

  • Random error, which may vary from one observation to another. Random error (or random variation) is due to factors which cannot, or will not, be controlled. Random error often occurs when instruments are pushed to the extremes of their operating limits. For example, it is common for digital balances to exhibit random error in their least significant digit. Three measurements of a single object might read something like 0.9111g, 0.9110g, and 0.9112g.

Systematic error or Inaccuracy (see Figure 3) is quantified by the average difference (bias) between a set of measurements obtained with the test method with a reference value or values obtained with a reference method.


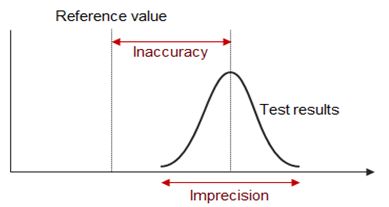
Figure 3 Imprecision and in accuracy

2. Uncertainty

There is uncertainty in all scientific data. Uncertainty is reported in terms of confidence.

  • Uncertainty is the quantitative estimation of error present in data; all measurements contain some uncertainty generated through systematic error and/or random error.
  • Acknowledging the uncertainty of data is an important component of reporting the results of scientific investigation.
  • Careful methodology can reduce uncertainty by correcting for systematic error and minimizing random error. However, uncertainty can never be reduced to zero.

Estimating the Experimental Uncertainty For a Single Measurement

Any measurement made will have some uncertainty associated with it, no matter the precision of the measuring tool. So how is this uncertainty determined and reported?

The uncertainty of a single measurement is limited by the precision and accuracy of the measuring instrument, along with any other factors that might affect the ability of the experimenter to make the measurement.

For example, if you are trying to use a ruler to measure the diameter of a tennis ball, the uncertainty might be ± 5 mm, but if you used a Vernier caliper, the uncertainty could be reduced to maybe ± 2 mm. The limiting factor with the ruler is parallax, while the second case is limited by ambiguity in the definition of the tennis ball’s diameter (it’s fuzzy!). In both of these cases, the uncertainty is greater than the smallest divisions marked on the measuring tool (likely 1 mm and 0.05 mm respectively).

Unfortunately, there is no general rule for determining the uncertainty in all measurements. The experimenter is the one who can best evaluate and quantify the uncertainty of a measurement based on all the possible factors that affect the result. Therefore, the person making the measurement has the obligation to make the best judgment possible and to report the uncertainty in a way that clearly explains what the uncertainty represents:

Measurement = (measured value ± standard uncertainty) unit of measurement.
For example, where the ± standard uncertainty indicates approximately a 68% confidence interval, the diameter of the tennis ball may be written as 6.7 ± 0.2 cm.
Alternatively, where the ± standard uncertainty indicates approximately a 95% confidence interval, the diameter of the tennis ball may be written as 6.7 ± 0.4 cm.

Estimating the Experimental Uncertainty For a Repeated Measure (Standard Deviation).

Suppose you time the period of oscillation of a pendulum using a digital instrument (that you assume is measuring accurately) and find: T = 0.44 seconds. This single measurement of the period suggests a precision of ±0.005 s, but this instrument precision may not give a complete sense of the uncertainty. If you repeat the measurement several times and examine the variation among the measured values, you can get a better idea of the uncertainty in the period.

For example, here are the results of 5 measurements, in seconds: 0.46, 0.44, 0.45, 0.44, 0.41.

For this situation, the best estimate of the period is the average, or mean.

Whenever possible, repeat a measurement several times and average the results. This average is generally the best estimate of the “true” value (unless the data set is skewed by one or more outliers). These outliers should be examined to determine if they are bad data points, which should be omitted from the average, or valid measurements that require further investigation.

Generally, the more repetitions you make of a measurement, the better this estimate will be, but be careful to avoid wasting time taking more measurements than is necessary for the precision required.

Consider, as another example, the measurement of the thickness of a piece of paper using a micrometer. The thickness of the paper is measured at a number of points on the sheet, and the values obtained are entered in a data table.

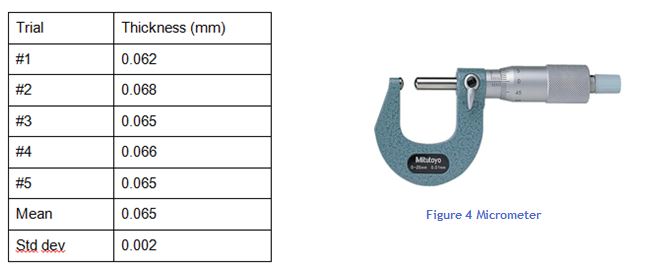
This average is the best available estimate of the thickness of the piece of paper, but it is certainly not exact. We would have to average an infinite number of measurements to approach the true mean value, and even then, we are not guaranteed that the mean value is accurate because there is still some systematic error from the measuring tool, which can never be calibrated perfectly. So how do we express the uncertainty in our average value?

The most common way to describe the spread or uncertainty of the data is the standard deviation

Figure 5 Standard deviations of a normal distribution

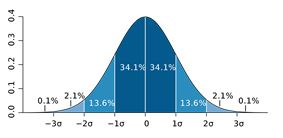
The significance of the standard deviation is this:

if you now make one more measurement using the same micrometer, you can reasonably expect (with about 68% confidence) that the new measurement will be within 0.002 mm of the estimated average of 0.065 mm. In fact, it is reasonable to use the standard deviation as the uncertainty associated with this single new measurement.

This is written:
The thickness of 80 gsm paper (n=5) averaged 0.065 (s = 0.002mm)
           s = standard deviation
OR
The thickness of 80 gsm paper (n=5) averaged 0.065 ± 0.004 mm to a 95% confidence level.
(0.004 mm represents 2 standard deviations, 2s)

Standard Deviation of the Means (Standard Error of Mean (SEM))

The standard error is a measure of the accuracy of the estimate of the mean from the true or reference value. The main use of the standard error of the mean is to give confidence intervals around the estimated means for normally distributed data, not for the data itself but for the mean.

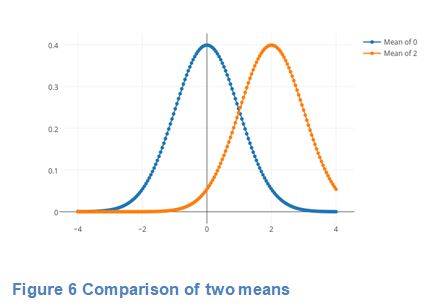
If measured values are averaged, then the mean measurement value has a much smaller uncertainty, equal to the standard error of the mean, which is the standard deviation divided by the square root of the number of measurements.

Standard error is often us
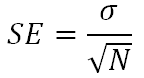
ed to test (in terms of null hypothesis testing) differences between means.

For example, two populations of salmon fed on two different diets may be considered significantly different if the 95% confidence intervals (two std errors) around the estimated fish sizes under Diet A do not cross the estimated mean fish size under Diet B.

Note that the standard error of the mean depends on the sample size, as the standard error of the mean shrinks to 0 as sample size increases to infinity.

Figure 7 Salmon

Standard Error of Mean (SEM) Versus Standard Deviation

In scientific and technical literature, experimental data are often summarized either using the mean and standard deviation of the sample data or the mean with the standard error. This often leads to confusion about their interchangeability. However, the mean and standard deviation are descriptive statistics, whereas the standard error of the mean is descriptive of the random sampling process.

The standard deviation of the sample data is a description of the variation in measurements, whereas, the standard error of the mean is a probabilistic statement about how the sample size will provide a better bound on estimates of the population mean, in light of the central limit theorem.

Put simply, the standard error of the sample mean is an estimate of how far the sample mean is likely to be from the population mean, whereas the standard deviation of the sample is the degree to which individuals within the sample differ from the sample mean. If the population standard deviation is finite, the standard error of the mean of the sample will tend to zero with increasing sample size. This is because the estimate of the population mean will improve, while the standard deviation of the sample will tend to approximate the population standard deviation as the sample size increases.

Confidence Levels

The confidence level represents the frequency (i.e. the proportion) of possible confidence intervals that contain the true value of the unknown population parameter. Most commonly, the 95.4% (“two sigma”) confidence level is used. However, other confidence levels can be used, for example, 68.3% (“one sigma”) and 99.7% (“three sigma”).

Conclusion

Knowledge of normally distributed data and standard deviation are key to understanding the notions of statistical uncercertainty and confidence. These concepts are extended to the standard error of mean so that the significance of differences between two related datasets can be determined.

Glossary

Absolute error The absolute error of a measurement is half of the smallest unit on the measuring device. The smallest unit is called the precision of the device.

Array An array is an ordered collection of objects or numbers arranged in rows and columns.

Bias This generally refers to a systematic favouring of certain outcomes more than others, due to unfair influence (knowingly or otherwise).

Confidence level The probability that the value of a parameter falls within a specified range of values. For example 2s = 95% confidence level.

Data cleansing Detecting and removing errors and inconsistencies from data in order to improve the quality of data (also known as data scrubbing).

Data set An organised collection of data.

Descriptive statistics These are statistics that quantitatively describe or summarise features of a collection of information.

Large data sets Data sets that must be of a size to be statistically reliable and require computational analysis to reveal patterns, trends and associations.

Limits of accuracy The limits of accuracy for a recorded measurement are the possible upper and lower bounds for the actual measurement.

Measures of central tendency Measures of central tendency are the values about which the set of data values for a particular variable are scattered. They are a measure of the centre or location of the data. The two most common measures of central tendency are the mean and the median.

Measures of spread Measures of spread describe how similar or varied the set of data values are for a particular variable. Common measures of spread include the range, combinations of quantiles (deciles, quartiles, percentiles), the interquartile range, variance and standard deviation.

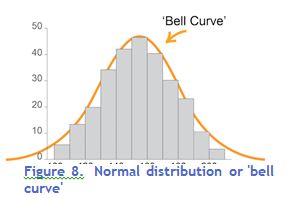
Normal distribution The normal distribution is a type of continuous distribution whose graph looks like this:

The mean, median and mode are equal and the scores are symmetrically arranged either side of the mean.

The graph of a normal distribution is often called a ‘bell curve’ due to its shape.

Reliability An extent to which repeated observations and/or measurements taken under identical circumstances will yield similar results.

Sampling This is the selection of a subset of data from a statistical population. Methods of sampling include:

  • systematic sampling – sample data is selected from a random starting point, using a fixed periodic interval
  • self-selecting sampling – non-probability sampling where individuals volunteer themselves to be part of a sample
  • simple random sampling – sample data is chosen at random; each member has an equal probability of being chosen
  • stratified sampling – after dividing the population into separate groups or strata, a random sample is then taken from each group/strata in an equivalent proportion to the size of that group/strata in the population
  • A sample can be used to estimate the characteristics of the statistical population.

Standard deviation This is a measure of the spread of a data set. It gives an indication of how far, on average, individual data values are spread from the mean.

Standard error The standard error of the mean (SEM) is the standard deviation of the sampling distribution of the mean.

Uncertainty Any single value has an uncertainty equal to the standard deviation. However, if the

values are averaged, then the mean measurement value has a much smaller uncertainty, equal to the standard error of the mean, which is the standard deviation divided by the square root of the number of measurements.

Works Cited

Measurements and Error Analysis, www.webassign.net/question_assets/unccolphysmechl1/measurements/manual.html.

Altman, Douglas G, and J Martin Bland. “Standard Deviations and Standard Errors.” BMJ (Clinical Research Ed.), BMJ Publishing Group Ltd., 15 Oct. 2005, www.ncbi.nlm.nih.gov/pmc/articles/PMC1255808/.

Hertzog, Lionel. “Standard Deviation vs Standard Error.” DataScience , 28 Apr. 2017, https://datascienceplus.com/standard-deviation-vs-standard-error/

Mott, Vallerie. “Introduction to Chemistry.”
https://courses.lumenlearning.com/introchem/chapter/accuracy-precision-and-error/

Schoonjans, Frank. “Definition of Accuracy and Precision.” MedCalc, MedCalc Software, 9 Nov. 2018, www.medcalc.org/manual/accuracy_precision.php.

“Standard Error.” Wikipedia, Wikimedia Foundation, 7 Mar. 2019,
https://en.wikipedia.org/wiki/Standard_error

2336 | NSW Education Standards, 
https://educationstandards.nsw.edu.au/wps/portal/nesa/11-12/stage-6-learning-areas/stage-6-science/biology-2017/content/2336

1319 | NSW Education Standards, https://educationstandards.nsw.edu.au/wps/portal/nesa/11-12/stage-6-learning-areas/stage-6-mathematics/mathematics-standard-2017/content/1319

Jim is an educational researcher and independent educational consultant. His M.Ed (Hons) thesis used an experimental design to evaluate the effectiveness of a literacy and learning program (1997). A recipient of the NSW Professional Teaching Council’s Distinguished Service Award for leadership in delivering targeted professional learning to teachers, he works with schools to align assessment, reporting and learning practice. He has been a head teacher of Science in two large Sydney high schools, as well as HSC Chemistry Senior Marker and Judge. For many years he served as a DoE Senior Assessment Advisor where he developed many statewide assessments, (ESSA, SNAP, ELLA, BST) and as Coordinator: Analytics where he developed reports to schools for statewide assessments and NAPLAN. He is a contributing author to the new Pearson Chemistry for NSW and to Macquarie University’s HSC Study Lab for Physics.

Unlocking Their Futures: The Arts, Career Development and Authentic Learning K-12

Unlocking Their Futures: The Arts, Career Development and Authentic Learning K-12

Kaity Conn’s students in rural NSW have experienced terrific success through career education and your students can too…

I was not always a Careers teacher. Like many teachers in the NSW Public Education system, my life and work experiences have been varied, and the strengths I have developed in its course have enabled me to confront challenges, as well as to seize and create opportunities.

I grew up in The Hills district and began teaching as a temporary teacher in the north of Sydney before moving to rural NSW in 2011 to teach English and History. I loved the way these subjects taught students to use their voice and explored the stories, pathways and possibilities of humanity.

Then, in 2014 I retrained in career education. I made this change as I felt that, in my new setting, highlighting the careers-based relevance of sometimes obscure-seeming knowledge and skills could prevent disengagement. So, I learned more about career education through further study and working first in disability employment and then at Western Sydney University in career education, before returning to the profession as a Careers Adviser at Young High School.

Equipping youth with skills to make them employable in our fast-changing world is a universal challenge, and youth employment in rural and regional settings is particularly problematic. These issues can be sources of concern for our communities and affect the wellbeing of the young people in our schools, but they can be successfully addressed by using Career Education as a tool for deep learning. The suggestions below are drawn from my experiences working with our community to develop real opportunities that have supported our students, K-12, to thrive within and beyond the classroom.

K-12 career development: building learning communities and positive futures

Figure 1. Unlock Your Future logo. Figure 2. Participating students from Maimuru PS, Monteagle PS, Murringo PS, Wombat PS, Young HS, Young North PS and Young PS.

Our school’s project was called Unlock Your Future. The idea involved authentic learning; we simulated real-world employment conditions, providing a platform for students to build their skills and confidence in a supported environment. It provided learning opportunities for the top skills needed for future employment and also included in our syllabuses, such as complex problem solving and creativity. By implementing this sort of pedagogical creativity, combined with an awareness of the skills required for future success, we found we were able to better develop each student’s transferable skills to prepare them for our rapidly changing workscapes.

As the Careers teacher at Young High School, I wanted the students to feel like they had personally achieved, and that they could keep achieving. The K-12 Unlock Your Future program created an opportunity to combine three goals at once, to innovatively address transferable skills acquisition, to develop student understandings of Career Development, and to support year 6-7 transitions.

The program was also intended to develop a mindset of self-confidence and efficacy in our students.

Our local project

Some 360 K-12 students from seven local schools were involved. The schools involved were comprehensive and culturally diverse, and there were students with all levels of ability participating. Initial data demonstrated many of these rural students did not have familial role models with higher education degrees and many did not know adults who were employed in the careers to which students themselves were aspiring. We felt that this was an important issue as many of our students would not necessarily have the connections or guidance that other more advantaged students may take for granted.

Statistics demonstrated that mental health was also a big issue in our local area, and whether directly or indirectly, we understood this was also likely to impede career aspirations and outcomes further.

Utilising the Australian Blueprint for Career Development (Career Education’s K-12 Curriculum), Career Development research and employment research, I developed Unlock Your Future. The program utilised the school’s strong performing arts culture as a foundation for creating a workplace scenario in which students could learn and be creative even if they were not ‘artists’. A similar program could be adapted based on any activity which suits your school. In this case, we employed students in different roles to facilitate and perform a children’s variety show whilst participating in other Career education follow-up activities, which developed skills and generated useful data for benchmarking and ongoing assessment.

The legwork

As a Careers teacher, I have autonomy to apply for a variety of useful grants. This one (from the Rural and Remote Education Office) specifically asked for creative and innovative programs, so as part of the application I wrote the script and selected the songs that drove the story. At least one dot point from every competency in the Australian Blueprint for Career Development was covered in the script. The content promoted self-awareness, positive self-concept, opportunity awareness (about different paths or careers) and decision-making. It emphasised that developing a strong sense of self, exploring options and making good decisions are more important than having all the answers about your future.

Job descriptions for over 60 different roles were developed along with 7 online applications distributed using Google Classroom. In addition to tasks, the role descriptions included a student’s reporting line and teams they were likely to work with. The online applications collected relevant data for analysis and also provided qualitative evidence of how capable students were of identifying, describing and marketing their own skills prior to involvement in the program. These were compared with data from follow-up surveys and activities completed after the performances.

Call to StageYou will use the plot book to follow the progress of the show and send Cast Movement team members to collect the next act.
Cast MovementYou will work with Call to Stage and Holding Room Teams to make sure that messages about when acts need to come to stage are clear and on time.  You will walk acts to their performance and count the students to make sure everyone is leaving on time.

Holding Room
Management

You will monitor students and teachers in holding rooms to make sure they have everything they need and that they remain quiet and calm in this area.

Figure 3. Example of job descriptions for roles from the Backstage category.

Authentic learning

High school students who wanted to be involved had to access job description booklets, follow the instructions, access the application forms on Google Classroom, select the correct application form, select their roles and provide information about their suitability as a candidate. Leadership positions were by interview, and other roles, announced via posters around the school. The majority of students had multiple roles and were supported to balance these effectively.

Figure 4. A lighting technician shines the spotlight during rehearsal; the band and senior choir, Young High School and Young Public School Hip Hop Dancers.

Students operated in teams which had tiered structures and shared leadership based on skill level and willingness. This structure promoted fairness, along with the development of respectful negotiation and strong communication. The leaders were given broad parameters for what was required and suggestions on how this could be achieved. They negotiated and worked creatively together.

Figure 5. Workflow diagram for receiving a brief and presenting an item with choir, dance and musical elements. Click on image to download.

We held weekly meetings to give and receive updates and have discussions. These discussions included how to manage competing priorities, how to ask for help and how to communicate constructively to solve problems. These meetings supported students to navigate workplace expectations, relationships, best practice and laws.

Our data

The show was a great success with over 1,000 audience members attending 4 sessions. The feedback from audience members, teachers and students was overwhelmingly positive:

  • Over 78% of students reported increased self-confidence;
  • Over 80% of students involved reported learning or improving upon skills;
  • Over 90% believe that the skills they utilised would be useful in employment.

Figure 6. Statistics describing the perceived impact of Unlock Your Future from the perspective of our teaching staff.

The table below illustrates the percentage of students who identified the skills they had used in their roles. They selected as many as relevant to them:

Figure 7. Table featuring student perceptions of the program. Teamwork, communication and being organised received the highest responses. Click on image to download

Any list of skills required for ‘the jobs of the future’ will include many of those in the table above. Additionally, many teachers commented that the skills encompassed in Unlock Your Future also supported student learning.

What did we all learn?

Our students have knowledge from the classroom, passion, skills of all kinds, a willingness to learn and share, creativity, community-mindedness and a drive to succeed. With carefully implemented support, students are willing to take responsibility, lead, work together, show resilience and solve problems, all with fantastic outcomes.

The teachers involved were amazed by the ability of these comprehensive, culturally diverse, K-12 students to work independently of teacher instruction and in teams to achieve their shared goals. Another consequence of their involvement was that teachers felt they would be comfortable giving the students greater leadership and responsibility in future activities as a result.

Figure 8. There were over 250 students in the choir, dancers and the band performing together in the Finale, supported by many offstage roles.

Conclusion

In Young’s community of local public schools, carefully structured Career education and authentic learning opportunities supported students to cultivate many of the skills they need to thrive in both learning and work environments. Students involved in Unlock Your Future had opportunities to contribute to shared goals and experience success through hard work and perseverance, and this impacted positively on their wellbeing, resilience and confidence.

The program has the potential to be scaled up or down for just about any activity. I would encourage other communities to actively seek opportunities to collaborate and utilise the varied skills of the teachers and students in local public schools for joint projects to support Careers learning, skills development, engagement, self-confidence and positive futures of all students.

Useful career education resources

Below is a select set of links to resources that support Career Education implementation in all schools.

Australian Blueprint for Career Development
Future Ready: A student focused National Career Education Strategy
MyFuture
Skills Road
World Economic Forum

Kaity Conn is a Careers Adviser at Young High School. She has been responsible for implementing extensive improvements to the delivery of Career Education to the school and its community of primary schools and providing professional development to both teachers and students. She has presented her acclaimed programs at the Careers Advisers Association of NSW and ACT Annual Conference. She has previously taught English and History in NSW Schools, and Career Education programs to undergraduate and postgraduate students at Western Sydney University.

Practical Creativity with Tangible Outcomes

Graham Sattler suggests an approach to combining music, emotion, language and technology in your classroom using the NSW Music Syllabus…

It is widely accepted that music pre-dates speech (Botha, 2009; Mithen, Morley, Wray, Tallerman & Gamble, 2006; Storr, 1993). Investigations of all cultures that have ever existed, and have been documented, indicate that music played and plays an essential part in cultural, individual and group (community) human development (Harvey, 2017).

While human speech developed, and continues to develop, to impart information, music exists to communicate emotion. Music acts as a social and emotional glue, connecting and comforting, inspiring, motivating, uniting and enthusing people. Even motivational speeches, whether to small groups of people or whole populations, rely on prosody; that is, the discipline of emphasising and exploiting the proto-musical elements of speech (rhythm, phrasing and intonation), to achieve a compelling and impactful result. Think of significant speeches throughout history, expressions such as hanging on every word and music to my ears exist for a reason.

The arts (and specifically, creativity) as a learning area is becoming compromised. The requirement of teachers to engage students in the understanding of (and expression through) artistic concepts, brings with it a need to develop tools, resources and strategies to facilitate student creativity and confidence in their capacity to create, appreciate and connect creative capacity and experience to their lives, their learning, community and cultural meaning. The good news is that tools and resources are easily, and in many cases freely, available. This article proposes a practical solution, called Music Emotion Language & Technology (MELT), to the third element of the equation; it offers a strategy, by way of a project plan for students to engage in the creative process, satisfy syllabus outcomes, and integrate with other Key Learning Areas while affording awareness and appreciation of cultural and language diversity.

Although the plan proposed herein for stages 4-6, it is both practical and scalable for students of any age and stage from early stage 1 upwards. For a list of NSW 7-12 syllabus outcomes integrated through this process please see Attachment 1.

While the project can be tailored to run across any number of sessions, here we consider an eight-week or session ‘course’. The number of sessions, however, is not a critical consideration; it is the staging of the process across the course that is important.

Outline

Across the (say, 8) class sessions, students identify and explore the musicality and emotional impact of everyday language and transform information-weighted text into emotion-weighted music.

To do this, students bringing a line of text to the session, and using music notation apps (ScoreCloud or similar), chart the expressive inflection in their own vernacular, language, or dialect (elements of pitch, emphasis and rhythm) and transform the inherent intonation of speech into musical patterns, creating a musical composition or compositions.

The melody, melodies, or sets of melodic fragments that result can be interwoven, creating counterpoint (separate melodies played in conjunction with each other). Harmonies and instrumentation (both acoustic and electronic, and potentially including the use of tablet and/or smartphone technology) can be explored and applied in relation to the emotional and dramatic meaning that emerges from the melodies and the texts.

Using available music technology programs or apps, such as Garageband or Logic, the composition(s) can be assembled and recorded with all participants having contributed to the development and performance outcome. While this sounds complicated, it need not be. Simple compositions can ‘emerge’ from one simple line of text from the youngest student. Two simple lines, or more, from as few or many students in the class as desired can be woven into original compositions and recorded on whatever devices (smartphones/mp3 recorders) are available. The music notation app or program comes into play in notating the pitches and rhythms inherent in the intonation of the recited text.

This is the point at which students’ emotions present as music!

There may or may not be a lyrics component in the final work or works. To some degree, outcomes demonstrate the primacy of music in expressing emotional meaning and drama over ‘language’ as a medium for communicating information. Shared ownership of the compositions means that the pieces, or sections/fragments thereof, would be available for students to incorporate into other workshops and learning activities across animation, game development, filmmaking and so on.

Initiating the process

Students would only be required to bring one or two lines of text to the process. The text(s) should not be from existing song repertoire, and should ideally be of the student’s devising. There is no requirement for rhyme, sophistication or poetic quality, and the inclusion of texts in more than one language, reflecting the cultural and language diversity of the school or class, is encouraged. The line(s) of text should be in some way meaningful to the student, and the student should be able to articulate, in simple terms, what that meaning is. Click here to view or download table.

The plan

Creating musicians

Through the process outlined above, students will create, record and perform a composition that is meaningful to them, is culturally relevant and, that explores both awareness and appreciation of diversity. Through thoughtful investment and engagement in the creative process from the first step, you can lead them to participate in making their own music, regardless of their age and stage, while developing facilitated collaborative practice and identity. Placing students in control and supporting them to use existing, found, and developed materials, also develops the skills to be creative, innovative, thoughtful, confident and informed musicians. Through our lessons, we can encourage our students to express themselves and their cultures; and consider and engage with the cultures, cultural values and practices of others.

And, isn’t that what a comprehensive public education is all about?

References:

Australian Curriculum, Assessment and Reporting Authority (2019), The Australian
Curriculum, F-10 Curriculum, The Arts, Music
 
https://www.australiancurriculum.edu.au/f-10-curriculum/the-arts/music/

Botha, R. (2009). On musilanguage/“Hmmmmm” as an evolutionary precursor to language.
Language & Communication, 29(1), 61-76.
Harvey, A. (2017). Music, evolution, and the harmony of the souls. Oxford University Press, UK: Oxford.
Mithen, S., Morley, I., Wray, A., Tallerman, M., & Gamble, C. (2006). The singing neanderthals:  The origins of music, language, mind and body. Cambridge Archaeological Journal,16(1), 97-112.
NSW Education Standards Authority. (2003). Music 7-10 Syllabus. Sydney: NSW Government. http://educationstandards.nsw.edu.au/wps/portal/nesa/k-10/learning-areas/creative-arts/music-7-10
NSW Education Standards Authority. (2009). Music 1 Stage 6 Syllabus. Sydney: NSW Government.   http://educationstandards.nsw.edu.au/wps/portal/nesa/11-12/stage-6-learning-areas/stage-6-creative-arts/music-1-syllabus
NSW Education Standards Authority. (2009). Music 2 Stage 6 Syllabus. Sydney: NSW Government. http://educationstandards.nsw.edu.au/wps/portal/nesa/11-12/stage-6-learning-areas/stage-6-creative-arts/music-2-syllabus
NSW Education Standards Authority. (2018). Australian professional standards for teachers. Sydney.
Storr, A. (1993). Music and the mind. New York: Ballantine.

Dr Graham Sattler has extensive music teaching experience in primary, secondary and adult education settings. He has been involved in course design and delivery around concepts and strategies for both pre-service and existing teachers, writing and delivering K-6 and secondary Music courses in partnership with the NSWTF CPL since 2014, and is committed to the principles of access and equity and student-focused learning experiences. Graham presents regularly at international music education conferences, drawing on his PhD research in the field of socio-cultural development through group music activity in marginalised communities. He is currently Executive Director, Mitchell Conservatorium and Casual Academic, Central Queensland University.

Building Confidence and Success in Stage 6

Khya Brooks suggests an approach to the HSC which can reduce everyone’s anxiety…

On the day my first HSC classes’ results were released, I was nervous and excited. However, I did not expect the reactions that I witnessed.

Many people turned to me and said “Congratulations. You did so well”, as though I had just sat the tests myself. Meanwhile, some of my colleagues were sitting with their head in their hands saying “I didn’t even get one band 6. What happened?” The rest of the day was spent listening to colleagues criticise their own practice and try to justify their classes’ outcomes to themselves; “Oh, I should have focused more on this area in the syllabus…” and “If only I had thought to revise this case study more thoroughly”.

What I learnt that day was to internalise the HSC results as though they were my own. I learned that my classes’ success somehow translated into how valuable I was as a teacher. The day was not spent celebrating, it was spent critically reflecting. Sure, this is great practice for long-term improvement, but what I have found is that it has also increased the pressure experienced by teachers. I have noticed that this pressure is then often transferred onto students, resulting in unnecessarily increased anxiety throughout the school.

I argue that this approach is reflective of a growing individualistic and negative culture within society and therefore teaching; which positions individual teachers rather than school systems or society more widely as solely responsible for student outcomes. This anxiety is reinforced by constant questions from the school executive, such as “Did you differentiate enough?”, “Are you providing enough scaffolds?”, “How many band 6s will you get this year?”

There is often too much pressure on many of the adults and, subsequently, many of the children at school.

I thought school was supposed to be joyful!

What to do?

So, I decided to actively address this cultural shift. I wanted students to own their own learning, rather than assuming it was all my responsibility. I began to reshape my programs, assessments and my overall practice. The more confident and successful my students became with their skills, the more confident and successful I felt within my practice. Our collective anxiety melted away and school days became more positive.

I found this new approach enabled me to have a better range of measures to gauge my success as a teacher. Rather than relying on quantitative numbers at the end of the HSC, I established a clearer set of procedures that allowed me, and the students themselves, to better measure our progress.

Below are some practical strategies that have helped me in achieving this cultural shift in my classroom, with a view to empower learners and improve their confidence, and ultimately, their success. I will focus prominently on the strategies utilised with my Society and Culture classes, but they are strategies that are easily transferrable to other subjects.

Please note, I work in a partially-selective public school in South-West Sydney. This means I have a large range of students; from high to lower ability, from advantaged to disadvantaged backgrounds, and from the disengaged through to some ‘over workers’. I have found that these strategies have assisted all of my students. For this reason, they should be applicable in almost any school context.

Strategies to develop a culture of student-driven learning

No summary, no marks

A strategy I have implemented is to withhold marks from students after they initially receive their assessments back. I encourage students to read through their feedback, and write a summary outlining what they need to work on, and how they intend to improve a particular skill in future assessments.

Once they do this, I provide them with their mark. This is a way to maximise student engagement with feedback. Also, students tend to keep these summaries and read over them before submitting future drafts.

Specific student-led feedback

I no longer accept copies of drafts from students seeking copious feedback. I found that quite often I would have read a draft several times before it came to marking it, and it was exhausting, time consuming and students generally still made similar mistakes in later assessments (indicating it was not as effective as I wanted it to be).

As a result, I developed a feedback matrix to use with my classes. The matrix outlines a three-step feedback system where I give specific feedback at set times and students are required to actively engage with it. The steps are outlined in Image below or click here to view.

                           Image 1 – Feebdack Matrix

There can be many benefits to using the matrix. As students use the marking criteria to develop specific questions for their feedback, they self-identify areas they thought they were not as strong in. For teachers, this means no longer spending copious time fixing tiny issues. Instead, we are able to provide wider feedback that students then identify in their own work. Also, students can easily see if their ‘limitation’ was someone else’s strength, and they can seek more help from one another.

Grouped feedback activities

Following the submission of a formal assessment task, I allocate each student a shape based on the marking criteria. Each shape is representative of a skill they should aim to actively improve. I then dedicate a lesson to improving those skills by grouping students by shape around the room, and each ‘shape group’ completes an activity dedicated to improving that skill. For example, I gave a student a triangle to indicate that they needed to better synthesise their research. I then had a triangle station, where all students that received the triangle worked on an activity where they ‘blended’ primary and secondary information together to identify conclusions. Students then practised writing these conclusions into paragraphs, to improve this skill further.

Strategies to develop specific skills

Writing

To improve student writing, I developed an acronym (shown in Image 2 below) focussed on sentence starters. Whilst there are many popular paragraph structures around, this approach focusses on the sentence level and students tend to find this more visible. Over the course, students begin using different sentence starters, eventually utilising the acronym as an editing checklist rather than a structure. It has been hugely successful across all stages and courses and has also been adopted by various other faculties and schools.

               Image 2 – Writing Acronym

Once this acronym is introduced, I often develop an activity where students read various responses and highlight the different elements using different colours. The responses are usually related to course content, so that students actively learn relevant information through the process. We then discuss which responses were better and why, and students rewrite one of the poorer examples using the structure themselves. Often, I will then have students ‘highlight’ one another’s responses to begin to foster a peer marking culture.

I also use the highlighting activity as self-guided feedback through the course. Students learn to highlight their responses and identify whether they have used too much description, or if they need to embed more examples.

Applying concepts

In many subjects, applying concepts is integral. I scaffold this skill in a multitude of ways.

  1. The concepts are colour coded in my classroom, and are all displayed on the wall.
     
  2. Each lesson, I have students identify the various concepts that were discussed in class. Through this, students learn that a lesson can cover elements of a concept without the teacher explicitly stating it, and so they begin to look for opportunities to make these connections themselves.
     
  3. I provide students with paragraphs from previous responses. Students identify two concepts that would enhance the paragraph, and rewrite the paragraphs with the concepts applied. They then peer mark one another’s responses.
     
  4. Randomly, I will pass each student three cards, one with a ‘fundamental’ concept, one with an ‘additional’ concept and one with a ‘related’ concept. Students are then given one minute to prepare, and then discuss a key point of the case study using all three concepts. It helps to revise content, and enhances students’ ability to apply concepts appropriately.

Strategies to build a culture of success in the subject

One of my biggest successes has been developing a good rapport between cohorts. This has enhanced the mentorship my Year 11 students receive each year, and has also contributed to the growing profile and number of Stage 6 classes in my school.

Year 11 markers

Each year, one week before the Personal Interest Project (PIP) major work is due, I spend a day with my Year 11 students deconstructing exemplar PIPs and marking them collectively. This is a positive and voluntary experience, and the focus is about building up each other rather than putting pressure on Year 11 to produce Year 12 level work, or, of criticising older students.

Once students feel more confident in their understanding of the requirements of each section in the PIP, I then have them ‘mark’ draft Year 12 PIPs. This provides an array of advantages, such as my Year 12 students are provided with additional feedback, my Year 11 students have a better understanding of the skills required of them to achieve higher results, and I use the opportunity as a checkpoint to ensure all students have finalised their PIP at least a week prior to submission day.

Q&As

Each year I ask a number of my previous Year 12 students to come and speak to my new Year 12 students. The new group develop questions they want answered and my older group provide hints, tips and pieces of advice. Often, the older students offer to assist with PIP topics or research too.

Student developed questions

Lastly, following each topic, I have students map past HSC questions to the syllabus dot points and concepts. Students then develop a question for the topic, by mixing two dot points and adding a verb or integrating a concept. Finally, students add their question to a shared document and everyone selects three questions to respond to for practise.

This empowers students to develop their own resources for revision (I also get a bank of new question ideas). Often students will then show the question designer their response, and this suggests more collegiality between the students, as the class becomes more focussed on achieving great marks for everyone rather than personal or individual success alone.

Building up each other

It is important to note that I am very explicit with my students about the skills they learn, and how each of these strategies empowers them as learners. What I have noticed after integrating the strategies listed above is that students become less reliant on me to feed them information and are much more active about their own development. This allows each of them to feel confident and ultimately enables them to succeed as a class. It also makes it easier for me to measure how well they develop essential skills. It is this development that I value most in my teaching, knowing my students have come so far, and guiding them to continue to learn and grow more confident even when they are no longer in my classroom.

Khya Brooks currently teaches in Social Sciences at Elizabeth Macarthur High School. She has conducted workshops at the Australian Geography Annual Conference, worked in collaboration with local schools to develop higher-order-programs for the Australian Geography Curriculum, conducted research and had it published on behalf of the Western Sydney University EPIC (Educational Pathways in the 21st Century) program and contributed to educational podcasts. Khya’s students have received awards from the Society and Culture Association​ for their outstanding accomplishments in examination and PIP components of the HSC course. She has also contributed to the sustained growth and success of Stage 6 classes in her school. Khya is currently refining her approach to higher-order-learning strategies, and is guiding a research cycle of inquiry within her school.


“From little things big things grow”: Cleaning Up Our Waste and Building Up Our Community

Kimberley Cutting shares her school’s journey to improve our environment…


Schools are at the forefront of sustainability. We are in a significant position to influence parents and communities, and our students will grow to be the next environmental leaders and policy makers.

We had a problem

Like many schools, all of Kiama High School’s waste has been sent to landfill for decades, and with over 1,030 students and 90 staff, this had large and compounding implications for our environment. In 2018, we partnered with ABC TV’s War on Waste to reduce our waste and, in just two school terms, we were able to reduce our landfill waste from 15m3 per week to just 6m3 (see figures 1 and 2). Involving the War on Waste program helped to document and share our activities. Importantly, all of our initiatives can be achieved at almost all of our NSW Public Schools.

Measuring success

We found the benefits were evident in improved environmental impact, and there were also added successes such as enhanced school and community culture along with financial savings which could be invested into other school projects, facilities and resources. The savings were significant, with our waste management fee of $2344 per month in November 2017 reduced to $1534 per month by September 2018.


Figure 1 One week’s worth of waste in May (prior to changes) and again in June (after 3 months of new waste system). Photo credit: ABC TV War on Waste, Season 2 – Episode 3.


Figure 2 Reduction of key waste items since implementation of new waste system. Photo credit: ABC TV War on Waste, Season 2 – Episode 3.

Getting started

To begin our journey, students from Years 7-12 formed a voluntary group of passionate ‘Waste Warriors’. From this start, over 40 students conducted a waste audit prior to any changes at the school and again 3 months after the changes had been implemented. The initiatives proved a huge success, including over 50% reduction in waste going to landfill, a saving of up to $800 per month in waste management fees and fundraising of approximately $500 per term through Return and Earn. Another unexpected outcome was a massive reduction of litter in the school playground, suggesting an associated awareness and sense of school pride and responsibility.


Figure 3 ABC TV’s War on Waste at Kiama High School. Students sorted waste into four waste streams during the first waste audit. Photo credit: ABC TV War on Waste

Steps to improve sustainability at our school

  • We changed waste management provider to Cleanaway as their service allowed us to implement commingle recycling and food recycling in the school.
     
  • New bins were purchased for the school playground, staffrooms and classrooms, including paper/cardboard, commingle recycling, landfill and food organics at a cost of $13,000. We found it was essential to ensure that each classroom had a paper/cardboard recycling bin as this convenience reduced our paper inadvertently going to landfill, from 99.1kg to 10.1kg per week.
     
  • We acquired an e-waste recycling bin from Reverse E-Waste. This is supplied and collected free of charge and allowed the school to dispose of electronic waste safely, ensuring that the valuable resources contained within these products were also recycled.
     
  • Focusing education for students and staff on why, how and what we were attempting, along with ongoing promotion at school assemblies, during Positive Behaviour for Learning lessons, on social media and school newsletters also kept momentum going and involved more and more recruits as we demonstrated our commitment to sustaining each initiative.
     
  • Our canteen needed a big overhaul, including a reduction of packaging and a move towards compostable and better types of recyclable packing. We also removed plastic straws and plastic cutlery.
     
  • Uplifting whole school events, such as ‘Trash-Free Thursdays’ to reduce single-use packaging in the school encouraged students and staff to bring their lunch to school ‘nude’ and in reusable containers. This weekly novelty spilled over to form new behaviours and improved waste habits beyond the designated day.
     
  • Student volunteers collect bottles for Return and Earn twice per week and we partnered with Envirobank, a company that collects our containers once per term for a small fee. The containers were then taken to their depot in Sydney and sorted by a machine and the money earned from this was refunded to the school’s Parents and Citizens’ Association. We became a local donation partner on the nearby “reverse vending machine” and this partnership allowed members of the community to donate their funds through Return and Earn directly back to the school.
     
  • We joined with TerraCycle to install free and ‘zero waste’ boxes to recycle items not traditionally recycled, such as, coffee pods, office supplies and beauty products.
     
  • A Battery World recycling bin was provided and collected free of charge. Batteries are potentially hazardous for human health and the environment and today, only 4% of handheld batteries are recycled every year.
  • Energy efficient hand dryers were installed in all bathrooms in the school to reduce paper towel use.


Figure 4 Year 7 students seated with the School’s bin system and containers they collected for Return and Earn.

Growth

We have been inundated with positive feedback from our community and have provided information to many other schools. We have ongoing education and promotion to encourage students to care for their environment and ensure bins are used correctly. For more information about our projects please visit the resources below:

  • Kiama High School’s Waste Management Guide
     
  • Email Kiama High School at kiama-h.school@det.nsw.edu.au
     
  • War on Waste can be viewed on iView at https://iview.abc.net.au/show/war-on-waste

This is the beginning of our journey to become a more sustainable school, and the students and staff at Kiama High School would like to encourage other schools to begin their journey too.

Kimberley Cutting is a HSIE teacher at Kiama High School. She is passionate about the environment, the ‘zero-waste’ movement and educating students to become informed and responsible citizens. Kim is part of the Kiama Community of Schools Sustainability Team and is currently working with other schools to improve their waste management.

Recognising Good Teaching: My Journey to Proficient Teacher

Lucille Flegg remembers good times at school and thinks Teaching Standards should reflect our high-quality, high-status profession…


My favourite teachers

When I look back at some of the key experiences I had as a student in the NSW public education system, it is with fondness that I remember the teachers who really made a difference to me. Below are some special memories:

Year 6
The teacher brought in Cynthia Voigt’s Homecoming. I remember how she pulled me aside before lunch and carefully gifted me the volume and explained she wanted to extend me beyond the novels in the classroom; it was to become my favourite book for a time.

Year 8
Mathematical concepts suddenly made sense! I distinctly recall how proud I felt when I realised I could actually succeed in Mathematics across Year 8 and Year 9, and it was the teacher’s explanations which made a difference for me.

Year 10
The teachers spent days and nights preparing for and making possible my cherished opportunities to perform scenes from Macbeth, Much Ado About Nothing and A Midsummer Night’s Dream at my school’s annual Shakespeare Day and Shakespeare Night events.

We know there has always been good teaching in NSW.

My experiences above, and many more, were made possible by the dedication of just a few of the intellectual, hard-working educators in our state. This article emphasises an approach to teacher accreditation that recognises the holistic nature of the Australian Professional Standards for Teachers (the Standards), and suggests that they should always be utilised with one goal in mind: quality teaching for every child in every classroom.

What’s in a Standard?

For the majority of my schooling, there were no published teaching standards in NSW, and my teachers did not have any accreditation requirements to meet. So, if I remember such good experiences as a student prior to accreditation requirements, what is the purpose of the Standards?

When I look back, the good teaching I can remember so clearly aligns with the Standards that have become second nature to me now. The Standards are a public statement of what constitutes quality teaching. There is power in having such a thing written down. Closer to home, at the beginning of each year, many people write down with pen and paper their new year’s resolutions. The familiar act of seeing goals on the page makes them concrete, and we often feel more accountable in meeting them.

without the mystery of a ‘feeling’ or ‘instinct’ of what some good practices might be

In reading each of the thirty-seven Standard Descriptors for the Proficient Teacher career stage (the required level of accreditation all NSW teachers must reach), it becomes clear that what is intended is a holistic description of high-quality practitioners; just like the ones I had when I was a child, without the mystery of a ‘feeling’ or ‘instinct’ of what some good practices might be.

Becoming a teacher

I decided to become a teacher when I was completing my HSC. I wanted to provide to others what my teachers had provided for me. I became passionate about my content areas in large part because of some key teachers in high school. When I made the choice to study teaching, I didn’t think about the Standards at all, but they came to be an intrinsic part of the journey ahead.

As a teacher, I found that I used the Standards more and more as I developed my practice. When I was working towards my accreditation, my goal was not about finishing it, but it was always about becoming a better teacher for my students. This goal remained unchanged after I achieved my Proficient Teacher accreditation (or Professional Competence as it was then).

In working towards my goal of becoming a better teacher, I observed my more experienced colleagues and learnt from them. I self-reflected when assessing student progress and allowed this to inform future decisions. When I wasn’t sure how to adapt my practice, I asked for help. When things didn’t go well, I asked myself, ‘what should I do now?’. I changed my approach to programming over time to allow for more meaningful, long-term learning experiences for my students. I sought professional development as a matter of course and applied what I learned.

When I was working towards my accreditation, my goal was not about finishing it, but it was always about becoming a better teacher for my students.

While doing these (and other) things, I also kept items that I thought might be useful for accreditation. Then, when I reflected on the Standards and thought I was ready, I began the process with my Head Teacher of selecting the items from my collection which gave an overall snapshot of my practice.

The journey was not about the accreditation requirements, but about becoming a better teacher over time. The Standards defined what this looked like; they allowed me to pinpoint the effective teaching I observed in others. Having the Standards documented as a reference for what exemplary teaching looks like was helpful to me. It meant that I could more readily define what I needed to work on, and improve accordingly.

This constant refinement may have happened naturally over time, yet without the Standards as an authoritative guide, my development may have been more challenging, taken significantly longer, and possibly become misguided or vulnerable to educational fads.

Better together

Significantly, the process of developing my practice against the Standards and becoming accredited gave me scheduled opportunities to work with my supervisor. Structured conversations around my practice helped immensely in reflecting on how I was going, and what I needed to work on. For my early career colleagues, the Standards guarantee these valuable conversations occur as part of our induction to the profession.

Having had this experience also aided me when supervising others later in my career. The Standards provide an anchor to frame professional discussions, facilitating meaningful feedback for professional growth. I also learned some fantastic practices from those I supervised in how to meet the Standards in different ways which I could bring to my own classroom.

Thus, meeting the Standards is not a static goal but an ongoing one. The Standard Descriptors remain crucial to me, and the conversations I have with teachers now who are working towards Proficient Teacher accreditation continue to centre on refining practice against the Standards to maximise student learning outcomes.

Tips for your accreditation

To all the teachers out there working towards Proficient Teacher accreditation, my best advice is to approach the journey as an opportunity to develop your teaching practice over time with the structured support that all professionals need and deserve when starting a career. This is the main purpose of accreditation, and the majority of your timeframe will involve developing your practice against the Standards. If you start with a focus on your practice and the Standards, the rest will follow. Other suggestions include:

  • Talk to your supervisor early in the process so that you are both on the same page and so that you have ample time to receive and apply feedback from them to continually refine your practice. Also, remember that you can draw upon other colleagues around you for feedback and advice on how you are going.
     
  • Be aware of the requirements for accreditation, so that you have a clear understanding of what you are working towards. All the information you need is on the NESA website, and you should read this carefully before you begin the process of finalising your accreditation. You should also be aware of any employer-based requirements around accreditation, and speak to your supervisor or principal if you are unsure.
     
  • Remember that the evidence needed to become accredited at Proficient Teacher will occur naturally as you do the day-to-day activities that come with being a teacher. The items of documentary evidence used for accreditation should be a genuine reflection of your practice, so hold onto items after you have used them, for example, program excerpts with your adjustments noted throughout and student work samples including your feedback. Also, remember to utilise the resources available on the NESA website, including the Evidence Guide for the Proficient Teacher Standards.
     
  • Start with your practice when selecting your final evidence. When you know you are meeting Standards, select items of evidence that demonstrate this. This will put you in better stead to write meaningful annotations that explain how the evidence you have selected demonstrates the Standard Descriptors.

Most importantly, do not be afraid to ask for help or advice from those around you, or from NESA. The accreditation process is about inducting the newest members of our profession with the support of others, and with the support of the Standards so that you know how to recognise good teaching practices, can improve your own teaching, and confidently join our important profession.


Lucille Flegg is a Policy Officer at the NSW Education Standards Authority (NESA). Her role focuses on quality assurance processes for teacher accreditation at Proficient Teacher. Lucille also supports schools, principals and teachers to implement NESA’s teacher accreditation policies. Lucille is committed to quality teaching against the Australian Professional Standards for Teachers and the provision of opportunities for the continual growth of teachers over the course of their careers. Lucille has been a Modern History, Ancient History and Society and Culture teacher and a Relieving Head Teacher in south western Sydney. She has experience mentoring early career teachers through their first years of teaching and has delivered professional development within her local community of schools.

Contact NESA for enquiries about accreditation by emailing PTenquiry@nesa.nsw.edu.au or calling 1300 739 338.

Power, Authority and the New Modern History Syllabus

Jonathon Dallimore offers some reflections on the new HSC Modern History Core due to be examined for the first time in 2019…

The new Modern History Core, ‘Power and Authority in the Modern World’, presents both an exciting and a challenging update to the HSC course. At a time when discussions of populism, authoritarianism and dictatorship abound, students are provided an opportunity to consider a period of history in which politics was radically destabilised, much more than the present day.

There would be little disagreement that issues of power, authority, democracy and globalism (all central to this new Core topic) are important for students of the modern world to explore. Importantly, they also underpin other topics that students can study in the HSC course; in one form or another they are at the heart of most National Studies, Peace and Conflict studies and Change in the Modern World topics. This new Core can, therefore, be leveraged to tie links between other topics that students might investigate depending on the choices a school/teacher makes in setting up the course.

That said, this topic is much larger in scope than the previous Core, World War One, which covered a five-year period and focussed mostly on the Western Front. Power and Authority covers the period 1919 – 1946 (27 years) and requires students to come to terms with a much broader set of issues. This presents a challenge, and a new set of examination specifications will certainly add to the complexity of teaching this new topic for the first few years.

In the reflections that follow, I would like to highlight some key questions and issues that have arisen regularly as I have run workshops, visited schools to assist with program design and generally responded to questions about the new Modern History Core. There is, obviously, much more that could be said on this topic, and my hope is that these ideas might be useful as teachers and students begin exploring this topic over the next twelve months. My observations are based on my reading of the syllabus, and the support materials and the sample questions NESA have published.

Where to begin?

One approach to teaching Power and Authority would be to start with the first dot-point (‘an overview of the peace treaties…’) and move through the following points sequentially. An alternative might be to find a central theme that runs through the topic, such as ‘internationalism and nationalism’, that allows students to make connections between different parts of the topic as they explore the content.

Following the latter suggestion, it might be useful to start the topic by surveying the peace treaties that ended World War One and then introduce the ‘intentions and authority of the League of Nations’ (from the last section of the topic: ‘The search for peace and security in the world’). Not only does this make chronological sense in that the League of Nations was established in 1919 – 1920 during ongoing debates about the closure of the Great War, but it also sets up a theme of internationalism/nationalism that can be referred back to consistently throughout the topic. As the students then explore the Russian, Italian, German and Japanese regimes, they can compare-and-contrast their interaction with the League, why it ultimately failed and then consider how the United Nations developed the ‘intentions and authority’ of the League following the Second World War.

Where do sources ‘fit’ into this topic?

Although it has been a consistent message regarding this new Core topic, it is worth restating that teaching the Power and Authority topic should be grounded in source material relevant to the various content points. Students will obviously need a broad understanding of the ‘facts’ and ‘content’ relevant to each dot-point but they also need to be prepared to work closely with a range of source material.

Importantly, for those who taught the German National Study in the previous iteration of the Modern History course, this means that the more dense and detailed coverage of the Nazi regime to 1939 may need to be amended. Students will not be required to construct 25-mark essay responses for this topic and, therefore, the amount of detailed knowledge they will be required to take into the examination is likely to be less than it was for the previous German National Study.

It is also crucial to point out that the previous emphasis on the three concepts of ‘perspective’ (P), ‘reliability’ (R) and ‘usefulness’ (U) in relation to source material is unlikely to feature in the same way for this new Core. Certainly, those ideas will still be relevant to explore within class and they may appear in some form or another in the examination, but teachers who have taught Modern History for some time will need to move beyond the PRU paradigm for the new Core study. The sample questions published by NESA, the History Teachers’ Association’s ‘Core Papers’ and Nicole Mansfield’s sample assessment task published in the September 2018 edition of Teaching History (HTA NSW, pp. 58 – 71) would provide a good starting point for those looking to broaden the scope of questions asked about source material.

What to do about timing?

The following is one suggestion for allocating the number of lessons to each part of this topic within the teaching unit. It should be noted that the 10% designation for the ‘survey’ is set as a requirement by the Modern History syllabus.

The other weightings provided below are not mandated by NESA but seem to be a reasonable division of the unit’s lessons to ensure that students develop a well-rounded understanding of the topic:

  • Survey (10%)
  • Rise of Dictatorships (about 25%)
  • Nazi Germany to 1939 (about 45%)
  • Search for Peace and Security (about 20%)

It is possible to integrate some of the content points from the ‘Search for Peace and Security’, for example ‘ambitions of Germany in Europe’, into some of the other major sections of this topic, such as ‘Nazi Germany to 1939’, which may mean that the percentage weightings allocated here are reshuffled slightly.

Some specific challenges

Most of the content-points within this topic are reasonably clear and it is easy to imagine examination questions developed from them. There are two, however, that seem a little awkward when considering how they might be ‘tested’.

The first is the ‘role of prominent individuals in the Nazi state’ dot-point. This obviously reflects discussions about the nature of Hitler’s power and the structure of the Nazi state that have been in the historical literature for many years. It is, however, hard to know how this could be examined given the wording of the point. Questions which arise include:

  • Can they name a ‘prominent individual’ in a question? (for example, Joseph Goebbels)
  • If so, since none are mentioned specifically in the syllabus, which ones are ‘fair game’?
  • If not, how could questions on this point be framed?

Perhaps something like the following could be a starting point:

  • Other than Adolf Hitler, outline the role of ONE prominent individual in the Nazi state.
  • Explain how prominent individuals contributed to the Nazi dictatorship between 1933 and 1939.

These are obviously not predictions regarding how these dot-points will be examined but are merely possible options for how they could be examined.

The second dot-point to consider is the ‘intentions and authority of the League of Nations and UN’. The League of Nations is logical in a topic that is largely centred on the ‘interwar crisis’. The United Nations, however, is more difficult to imagine as an examination question. The topic cuts off in 1946 which is barely enough time for signatories to ratify the UN charter and hold the first meeting of the General Assembly (January 1946), so how much might we expect students to know about this organisation? This is especially relevant when compared to the League of Nations, which was in operation for almost the entire period covered in this topic.

Perhaps a lower-mark question on the United Nations in an examination might be:

  • Outline the intentions and authority of the United Nations.

A higher-mark question drawing on the United Nations might be:

  • Compare and contrast the intentions and authority of the League of Nations and the United Nations.

Given the imbalance in what the students will learn about the two institutions in a topic covering the period 1919-1946, a compare and contrast question may not be as appropriate but that reaffirms the points: beyond a lower-mark question, how could the United Nations be ‘tested’ in an examination?

Examination notes

The basic examination specifications published by NESA for the new Modern History course are quite clear. For the Core topic, they note the following:

  • There will be 3-4 questions asked;
  • ‘Analysing and interpreting sources’ and ‘applying own knowledge’ will be required;
  • One of the questions will be worth between 10 and 15 marks;
  • All questions in the Core section of the paper must be answered.

These directions and the sample questions provided by NESA for the new Core do, however, leave a lot of issues unanswered regarding this section of the examination. Some of these complexities are explored further in the article ‘Challenge and Response: Setting New Modern History Core Questions’, in the September 2018 edition of Teaching History (Kiem and Dallimore, 2018).

Resources

There are a range of dedicated textbooks now in circulation for Power and Authority. The following resources are very useful and may be good to purchase for school libraries or faculty collections (they are in no particular order):

  • Stephen Lee’s The European Dictatorships (4th Ed.) – this is a very useful overview of the period covered in this topic and it includes strong coverage of the dictatorships in Russia, Italy and Germany (the fourth edition includes a very small section on Japan).
  • Bruce Pauley, Hitler, Stalin and Mussolini: Totalitarianism in the Twentieth Century (4th Ed.) – this is a shorter book than Lee’s but it provides a clear overview of the main dictatorships that are the focus of the topic (except Japan). It is also highly readable and appears to be targeted at a younger audience (late high school and early university).
  • Ian Kershaw, To Hell and Back: Europe, 1914 – 1949 – although this book also covers the Second World War and the early developments leading towards the Cold War, it provides a great insight into key issues of the Power and Authority topic.
  • Richard Overy, The Inter-War Crisis, 1919 – 1939 – Richard Overy is a very gifted writer and although this book seems aimed at undergraduate level, there are some very useful sections including a source cache at the back of the book (some of which may be too complex for the HSC topic).
  • Mark Mazower, Dark Continent: Europe’s Twentieth Century – this book covers the entire 20th century but the first several chapters are a highly readable account of the key issues underpinning Power and Authority in the Modern World.
  • Saburo Ienaga, The Pacific War, 1931 – 1945 – this book will provide useful detail on developments in Japan in the lead up to the Second World War which are covered in this topic.
  • Professor Richard J. Evans’ Gresham College lecture series ‘The Age of Dictatorship: 1919-1989’ provides excellent overviews of the Russian, Italian and German dictatorships. The first episode of that series (on Mussolini) can be accessed here.

Final thoughts

Although the new Modern History Core sets a different tone for the course, not everything is completely new. Many teachers will continue to explore the same national and conflict studies (some of which include only minor changes). More generally, the new Modern History syllabus strikes me as a positive update in some ways because we now have skills and concepts that run through Stages 4, 5 and 6. This will hopefully allow faculties to develop students’ historical thinking throughout junior courses and Year 11 in the lead-up to the HSC course.

This is the first time I have witnessed a major overhaul of the senior history syllabuses. It is a challenging process, especially when, for most teachers, a full 50% of the course will require change in Modern History (a new Core and an entirely new topic replacing the Personality Study). What makes the process less stressful is the community effort already well under way to produce and share resources and respond to issues as they arise. This, I think, the history teaching community in NSW does particularly well.

Jonathon Dallimore is currently on leave from teaching history at Smith’s Hill High School in Wollongong and is working part-time for the History Teachers’ Association of NSW. He has published a number of new texts for the new Stage 6 Modern and Extension History courses including Contesting the Great War (HTA NSW, 2017), Investigating Modern History (Cengage, 2017) and The History Extension Resource Book (HTA NSW, 2017), The American Civil Rights Movement: 1945 – 1968 (Cengage, 2018) and Conflict in Indochina: 1954 – 1979 (Cengage, 2018). Jonathon also teaches history methods courses at the University of New South Wales and the University of Wollongong.

“I Want to Get Physical, Physical”: Spatial Technologies Inside and Outside Your Geography Classroom

Lorraine Chaffer encourages you to confidently use spatial technologies in your classroom…

What is Geography like in your classroom?

With the new K-10 Geography syllabus implemented in all schools from 2017, it may well be timely to stop and ask ourselves a couple of reflective questions such as: What have the students been doing? What have we been doing? Is it working? What should we try next?

I have been looking inside many Geography classrooms across NSW and I have noticed students using spatial technologies to create digital tours, plot information from fieldwork activities, create digital elevation profiles, contribute to citizen science projects and examine or analyse real-time data.

The students like it. Increasingly, I think their teachers do too.

Outside the classroom, governments, organisations and individuals are using spatial technologies to analyse spatial data, create visual representations and make predictions in fields as wide ranging as urban planning, disaster management, agricultural production and climate change.

Spatial technology is creating significant and interesting employment opportunities in many industries

Spatial technology is creating significant and interesting employment opportunities in many industries, leading to a growing demand for trained technologists with spatial analysis skills. Geography has always been the subject that is relevant to all other fields. Now, the skills of geographers in both the humanities and technical industries are in increasing demand.

Spatial technologies include any technology that enables us to collect data about a location (place) and organise that data to show spatial patterns, usually on a map or satellite image.

We may not realise it but this technology has become an integral part of our lives through the devices we use, such as our computers, tablets and smartphones. All online programs, including social media applications, maps and games, have spatial components built into them.

Despite the prevalence of spatial technologies in our daily lives there remains a range of impediments to their use in the classroom. These include software and data access, hardware availability, computer room access and teacher expertise. This article seeks to build confidence and awareness of some of the practical applications teachers are using successfully now, whilst acknowledging that improved resources will also be essential for effective teaching of many of the positive aspects of our new syllabuses.

What does the Geography K-10 syllabus have to say about spatial technologies?

In the NSW Geography Syllabus 7-10, spatial technologies is one of the tools students use in geographical inquiry to gather, interpret, analyse and communicate geographical information.

The syllabus glossary states:

Spatial technologies include any software or hardware that interacts with real world locations. Examples include, but are not limited to, virtual maps, satellite images, global positioning systems (GPS), geographic information systems (GIS), remote sensing and augmented reality. Spatial technologies are used to visualise, manipulate, analyse, display and record spatial data.

                        Geography K-10 Syllabus

In the Continuum of Tools, examples of spatial technologies are listed to provide teachers with options when selecting technologies that are content and stage appropriate. For instance,

  • Stages 1 to 3 – virtual maps, satellite images and global positioning systems (GPS);
  • Stages 4 and 5 – virtual maps, satellite images and global positioning systems (GPS); remote sensing, Augmented Reality (AR) and Geographic Information Systems (GIS).

Over time it is expected that students will experience a range of these spatial tools in the context of asking and answer key geographical questions. By the end of Stage 5 students should feel confident enough to independently choose a spatial technology application for geographical inquiry tasks.

We still need to ask important questions

At Stage 1, students might experience spatial technologies when examining a digital map or using Google Earth to find their suburb or their house. The aim is not only to have students play with the technology but to learn its value in answering questions they have about their world. These questions may include: Where is it? How are places organised?

Continuing with this rationale in mind, by Stage 4, students could be using Geographic Information Systems (GIS) to answer questions such as: What patterns can be observed? How can these spatial patterns be explained? What relationships can you see between features?

The aim is not only to have students play with the technology but to learn its value in answering questions they have about their world.

The technology can then be used to represent their data as layers of information on a map or image. The layers can be turned on and off, allowing choices to be made about the information relevant to a geographical investigation. For example, a layer that shows areas susceptible to flooding in a local area or where rice is grown on a map of the world could help students understand and plan for questions around water as a resource or the impact of hydrological hazards.

At a basic level, a student will use data sets which already exist in an application such as the different layers in Google Earth or Geographic Map Maker. At a more sophisticated level, students will add their own data to create a layer on a map or image using programs such as Esri Story Maps or Google My Maps.

The big five spatial tools

GPS – a global navigation system that uses satellites and ground monitoring stations to locate places using a system of geographic coordinates. The most common application is the use of GPS in cars.

GIS is the system that captures, stores and manipulates geographical data linked to geographic coordinates. It creates data layers in a visual format, such a map, for analysis. In your car, the GPS data collected from the satellite is plotted onto a map that shows where you are.

Remote sensing is a way of obtaining information about places from a distance, usually using aircraft or satellites as well as instruments such as drones, remote cameras, thermal scanners, atmospheric balloons and ocean buoys.

Augmented reality (AR) provides an enhanced version of reality in which computer-generated images (virtual elements) are superimposed onto real world views. In the Geography classroom, the use of AR allows students to obtain extra information about a place or environment from the augmented image. A good example is an Augmented Reality Sandbox in which contour lines are superimposed over landforms created in the sandbox and rain can be simulated to allow a study of runoff and river flow.

Virtual reality (VR) is a digital recreation of an environment or situation. Users feel like they are experiencing the place or event. In the Geography classroom, the use of VR allows students to experience real environments they may never visit in person by using a headset (goggles) and a smartphone.

Real time data visualisations show environmental change as it happens. Satellites capture and analyse global data instantaneously. This data is used to create real time visualisations. Examples include applications that show the movement of fishing vessels and container ships at sea and monitor weather systems as they occur.

Introducing spatial technologies in the Geography classroom

Confidence is the key to the successful use of spatial technologies in a classroom, but it is also the reality that many students will pick up the skills they need to use these technologies very quickly. For teachers and students, there are free online tutorials for most spatial technology applications used in Geography classrooms worldwide.

My suggestion is to select one spatial tool at a time to develop your skills, and integrate that tool into as many places in your curriculum as possible. Do not feel you need to learn everything a spatial technology tool can do at once; build your skills over time. Most importantly, have a ‘Plan B’ for those days the technology is not working or a problem arises during your lessons.

Importantly, student activities integrating the use of spatial technologies should have a purpose, be planned and have clear links to the syllabus content and outcomes. Use an inquiry question to focus student learning and provide clear instructions for students to follow. A planning template can be useful when developing activities that could be used as Assessments ‘as’ or ‘for’ Learning.

See Attachment 1 for Spatial Technology Activity Planning Document

Getting started or moving forward 

To develop your own confidence, try getting together with colleagues to experiment with some of the following examples, beginning with some real-time data visualisations first, then moving on to creating maps using programs with inbuilt layers of data. When your team is more confident, start using applications that require you to add your own data layers. Try one at a time and get ‘bang for your buck’ by trying out your new ideas across your classes for 7-10 or possibly across KLAs for K-6.

And, have some fun together!

1. Real-time data visualisations

  • Earth (global wind map) 
  • Global Fishing 
  • Flights / Flightradar 
  • Australian Bureau of Meteorology
  • Radar Loop 

2. Applications with inbuilt layers of geographical data:

  • Google Earth, to create an elevation profile
  • Geographic Mapmaker Interactive
  • Global Forest Watch 
  • The Story Map Gallery 

3. Application to create a GIS map:

  • Scribble Maps 
  • Google Tour Builder 
  • Story Map 
  • Getting started with Story Map 
  • Visualize your data on a custom map using Google My Maps 
  • GIS for schools ESRI Australia 

The foundations of successful Geography teaching remain a strong emphasis on inquiry and skill development to better understand and affect our world. When we keep strong pedagogy and content knowledge at the heart of our teaching, including a little new technology to investigate some very big questions could well be the next thing we should try.

Lorraine Chaffer has 38 years’ experience as a Geography teacher in NSW public schools and has been heavily involved in the professional development of teachers. Lorraine was a consultant in the development of the NSW Geography Syllabus K-10, has written textbooks for the Australian Curriculum Geography and the NSW Geography Syllabus K-10 and has worked with K-6 teachers across NSW to unpack the new syllabus and develop the essential knowledge, understanding and skills to deliver the syllabus effectively. Lorraine is the President of the Geography Teachers Association of NSW (GTANSW) and a board member of the Professional Teachers Council, and she provides professional learning for teachers of K-10 Geography Syllabus and Stage 6. Lorraine is editor of the GTANSW Geography Bulletin, has written articles for the CPL and presented on the new Geography Syllabus for CPL in 2017.

Getting Better at Assessment

Emma Finlayson reflects on what quality assessment is really about…

I am a middle career teacher. I have made it past the notorious ‘7 year quit’ and I have taught the full range of students across schools with student numbers between 300 and 1300. My experience has taught me that regardless of context, at the end of the lesson, school day, course, or term, all of our students will need to be assessed somehow.

This article is a guide to what I have learned about assessment; like all the best lessons, much of my wisdom has come from failure-ridden endeavours. These have often been of my own tragic making and have mostly involved me making a fool of myself at school.

What does good assessment entail?

It is so obvious when you are an early career teacher to simply re-use past examinations. And like many before me, I did!

I was Year 8 Science Co-ordinator when I used a past examination. One of the questions was:

(Description of Debbie Strauss’s work) Debbie Strauss is a zoologist. Describe what her daily job might entail.

What I did not notice then, and what I always look out for now, is that the choice of verb ensured the question was out of the reach of at least 60 percent of our students, 90 percent of whom were EAL/D.

It was not that the students struggled to describe what they thought a zoologist might do, day to day. It was that they did not understand what ‘entail’ meant and so they tended to leave the question blank.

I have since written similar questions, but now I ask:

Describe what Debbie Strauss might study in a normal work day as a zoologist.

Take home message

It is easy to forget that a question which seems straightforward in your own mind could be interpreted in a myriad of ways by students, all of whom are nervous and looking to achieve. Look at the wording of your question closely and ask: Is it pitched at an appropriate level for my students?

Incidentally, be aware when re-using or borrowing past assessments. If you use directly without modifying, it is very likely you have not considered the potential problems that may be lurking within.

Why did I come here?

We are all human. And that means that we are all fallible.

I tend to argue that my examinations are like Celtic art: I deliberately include an error so as not to challenge the perfection of the creator. Ahem. Maybe not.

While this might work the first time, it can wear thin quickly with your students.

When I started teaching, I was horrified by the prospects of making a mistake in an examination paper. I remain vigilant for errors and remember fondly watching a past colleague absolutely own his mistake.

My colleague was called to an examination owing to queries about a question. When he arrived, the students immediately started excoriating him because he had included a question on content that had not yet been covered. He argued, they argued, and then, in the end, my colleague dropped his head and muttered with a groan:

Why did I come here?

The students burst into laughter.

What did I learn from this? That when the same thing happened to me, I announced:

Great news! Your paper will be out of 95, not 100! By the way, cross out Question 30b.

The students cheered!

Take home message

It is okay to make mistakes, as long as you acknowledge them. Students know you are human. If we insist on infallibility, the effect is to teach our students to doubt themselves and their knowledge, to freeze up in examinations and become anxious around what might be included in formal assessment. There have been mistakes, even in the HSC. Very few, but still, it happens. It is what we do in the moment that matters and how we reassure our students and plan to avoid errors when it comes to the next task that can make a difference.

Question 27 is fantastic!

We know we are smart, right? We are teachers! Sometimes this thinking can lead to awkward situations.

Long, long ago, in an education system far, far away, there was a beast called the School Certificate, which was essentially, centralised examinations for Year 10.

A call came through to the staffroom:

We think there’s an error in Question 27! Can someone come and look at it?

Well, I was the only one in the staffroom. I was also in my first year of teaching, and determined to save the day. So, I ran to the school hall (yes, I ran), grabbed the paper and announced:

Could all students please put down their pens and turn to Question 27. If you read the question, you will see that…

Then I read the question. Then, and only then, did I realise it was asking students to correct mistakes in the question. What could I do? I just kept talking:

You will see that Question 27 is a great question. Isn’t it fantastic? Best of luck, Year 10!

Some of the students saw straight through me and were giggling, most assumed I was new and overeager. Needless to say, I beat a fairly hasty retreat.

Take home message

I am still blushing over this one. With the benefit of hindsight, I might conclude it is important to act with our hearts in the right place. Possibly, it is wise to first stop, understand the situation, consult with a colleague and, if we are to act (or react), to tread lightly.

Assessment is more than examination

The above are some things I have learned through failure. Along the way I have also learned much about effective assessment. It is important to see the point of assessment as more than a final examination or even the HSC.

Yes, good assessment entails questions that are meaningful and relevant. Yes, when it comes to formal and summative assessment we should be testing only that which we have already taught. Yes, we should work together to reflect on our pedagogy, and we should talk together about what matters and what we are trying to achieve before we act.

We should also remember to start as well as finish with assessment. Assessment is the initial insights into where our students are and where we will take them next. It is checking in during the lesson and taking time to reteach that which has not been understood before moving on.

Good assessment comes from knowing what is required and understanding why. It is about knowing what will help our students to learn more and how to allow them to demonstrate their best achievements. A starting point to improve your assessment practices for K-10 is the NSW Education Standards Authority (NESA) Advice on Assessment. For Years 11-12, NESA’s Stage 6 Assessment and 11-12 Assessment Advice are important reading.

Final thoughts

There will always be days when we could have done better. This article seeks to help you avoid the mistakes I have made. If we begin with our hearts in the right place and with a strong understanding of what is necessary and why some approaches can be effective, we can be well placed to assess in ways which are best and most wise for both ourselves and our students.

Emma Finlayson is a senior chemistry teacher at Concord High School. She has a special interest in EAL/D education in science and is an experienced teacher of GAT students. She has contributed to the creation of a range of resources for the new Stage 6 syllabus, including for a major publishing company. She also delivers workshops around classroom management for beginning teachers.


Follow Me into the Butterfly Garden

Neil Bramsen explores butterflies while teaching Mathematics and Science…

I am always keen to have my students undertake at least one major project based learning (PBL) experience each year.

In mid-2016 I had my stage two class work on revitalising an overgrown and neglected garden area into a ‘Butterfly Garden’. I was inspired by my visit to High Tech High in Chula Vista a few years ago where I saw a comprehensive PBL program in place, with a butterfly component including garden, plant propagation, egg collection and breeding, all supported by student-generated text and a website.

Talk about comprehensive!

Beginnings

Exploring regional butterflies and appropriate feeder plants introduced a strong environmental and biodiversity perspective as students considered the ecology of a butterfly habitat. Over the course of six months it was rewarding to document and reflect on the process that covered a multitude of learning areas, such as measurement and science and information reports, as well as the physical tasks of gardening and assembling materials.

Of course, PBL is a terrific way to ‘access’ this type of learning, and each student was able to achieve success through various entry and exit points that they could identify with. Key Learning Areas (KLA) such as Mathematics, Science, English and PDHPE came into play and offered a broad scope of learning opportunities.

I have found with any PBL that backward mapping to outcomes is the pragmatic and practical approach. I consider the activities that may be undertaken and then explore the relevant KLA scope and cross reference to the syllabus involved.

Measuring up

There was extensive use of measurement, both through aerial photography via a DJI Phantom Drone and scale and grid tasks that calculated the area of the garden and path. See a photograph below of the original site taken by the drone.

This measurement work then evolved into a volume activity for more capable students, and the depth of mulch and crushed concrete was calculated. It is important to note that while all students had an introduction or refresher to area and square metres for example, I then targeted students that were stretching themselves to explore volume and cubic metres.

The students used websites to source local materials, cost the materials and then ring the landscape company to place the order. They actually used the school credit card under my supervision (I had the CVV number) to ring and talk to the supplier and arrange the delivery. The students mapped access to the area.

Becoming alive

Highlights of the project included in-depth research into local butterflies and suitable host plants. The class explored colour and the types of colour needed to attract butterflies. Interestingly, while we initially focused on local plant species and native butterflies, the monarch butterfly and the need for the milkweed plant to support it were identified. We sourced milkweed, and this aspect has been the most successful, albeit with some winter wind damage to the milkweed. Propagating more milkweed plants would become an ongoing focus.

Importantly, as the image above demonstrates, the project all came together as students physically engaged with and enjoyed the gardening, from clearing weeds and moving barrow loads of mulch to pouring crushed aggregate to make the path. The area came to life as the seedlings and young plants began to mature.

A little organisation

Students also followed a product procedure to assemble timber benches so that the area was a welcoming learning space. A daily watering regime was added to the class task list, and deep saucers were added for birds and to provide water for butterflies.

The photograph above shows that, as the area established, it was then used for nature sketching, quiet time, reading and sensory awareness activities by the class.

Rewards worth working for

By late summer and autumn, we began to see monarch butterflies in the garden, just like the one in the photograph below. With some of the students that participated in the PBL project, we carefully examined the milkweed plants, which act as a host for egg-laying and monarch caterpillars. Not only did we find quite a few eggs on the leaf tips but also fifteen or so caterpillars in varying stages of maturity.

The kids were totally over the moon with the evidence of success and at seeing a natural life cycle occurring in the habitat that they had helped create. We are looking forward to monitoring the health of the garden and the number of monarch butterflies that mature. The garden has continued to be popular with my classes for nature sketching and quiet time and has now been dedicated as a special Year 6 Quiet Area during breaks.

Now, back to the syllabus

The project was an engaging opportunity to introduce teaching points from both the Mathematics and Science syllabuses. Some relevant outcomes are listed below.

Mathematics Stage 2 and Stage 3 outcomes

  • selects and uses the appropriate unit and device to measure lengths and distances, calculates perimeters, and converts between units of length MA3-9MG
  • measures, records, compares and estimates areas using square centimetres and square metres MA2-10MG
  • selects and uses the appropriate unit to calculate areas, including areas of squares, rectangles and triangles MA3-10MG
  • selects and uses appropriate mental or written strategies, or technology, to solve problems MA2-2WM
  • selects and applies appropriate problem-solving strategies, including the use of digital technologies, in undertaking investigations MA3-2WM
  • uses simple maps and grids to represent position and follow routes, including using compass directions MA2-17MG

Science Stage 2 and Stage 3 outcomes

  • shows interest in and enthusiasm for science and technology, responding to their curiosity, questions and perceived needs, wants and opportunities ST2-1VA
  • describes ways that science knowledge helps people understand the effect of their actions on the environment and on the survival of living things ST2-11LW
  • investigates their questions and predictions by analysing collected data, suggesting explanations for their findings, and communicating and reflecting on the processes undertaken ST2-4WS
  • describes that living things have life cycles, can be distinguished from non-living things and grouped, based on their observable features ST2-10LW
  • describes how people interact within built environments and the factors considered in their design and construction ST2-14BE
  • describes some physical conditions of the environment and how these affect the growth and survival of living things ST3-11LW

Keys to success

Before attempting your own special learning experience, consider and plan for the following:

  • Identify suitable project opportunities in the school grounds or local community;
  • Consider the teaching and learning outcomes and prepare to backward map the obvious outcomes while allowing for the unexpected. The opportunities for differentiated learning are extensive and every student can achieve success and growth in some aspect of learning;
  • Allocate sufficient time; PBL takes time, usually more time than you might think!;
  • Allocate resources and funding if needed;
  • Communicate to other classes, teachers and supervisors the aims and progress of the project to generate community and school ‘buy in’.

We can nurture many positive blooms through our school garden projects. Once your project has concluded, remember to celebrate the successes and share your experiences and new knowledge with your school and community.

Neil Bramsen is an Assistant Principal at Mount Ousley Public School, Wollongong. He actively engages with ‘the outdoor classroom’ and enjoys citizen science and space science. He is the recipient of the 2017 Prime Minister’s Prize for Excellence in Primary Science Teaching.

To follow Neil further use: @galaxyinvader and neilbramsen.edublogs.org.au

This is an updated version of the article published in STANSW Science Education News, 2017 Volume 66 Number 4, http://joom.ag/nTUL/p58. Visit STANSW’s website at: www.stansw.asn.au  

Posts navigation

Older posts
Newer posts

Recent Posts

    Recent Comments

    No comments to show.

    Archives

    No archives to show.

    Categories

    • No categories

    QUICK LINKS

    QUICK LINKS

    Join The Union

    Courses

    Journal

    Podcast

    Contact Us

    Share this page

    About

    Who we are

    What we do

    Presenters

    FAQ

    Professional Learning

    Courses

    Journal

    Podcast

    Policy and Guidelines

    Privacy Policy

    Social Media Guidelines

    Our Ethics

    Useful Links

    About

    Head Office Details

    Member Portal

    Media Releases

    Become a member today

    NSW Teachers Federation

    Connect with us

    © 2025 New South Wales Teachers Federation. All Rights Reserved. Authorised by Maxine Sharkey, General Secretary, NSW Teachers Federation, 23-33 Mary St. Surry Hills NSW 2010.